User Manual
Presentation
The MLS800 is a very easy to use MIDI controlled Loop Switcher with 8 audio loops. It adapts itself to your gear and setup, not the other way around!
- 8 audio loops
- 128 presets
- Active preset is remotely selected through
Program ChangeMIDI messages - Easy to read through a 4 digits 7 segments display and illuminated switches
- Open source
Great, now what?
The whole idea of a loop switcher is to enable or disable audio loops. Each loop consists of a send and a return signal, with something processing the signal in between.
in=>start: Previous loop
out=>end: Next loop
lc=>condition: Loop active ?
l=>inputoutput: External unit
lr=>inputoutput: Loop return

in->lc(yes,bottom)->l
lc(no)->lr
l(right)->lr
lr(right)->out
By chaining several loops, the MLS800 acts as a router that directs your audio signal to up to 8 external processing units. Leaving you with 28 possibilities to route your signal!
in=>start: Main input
out=>end: Main output
l1=>inputoutput: Loop 1
l2=>inputoutput: Loop 2
letc=>inputoutput: ...
l7=>inputoutput: Loop 7
l8=>inputoutput: Loop 8

in(right)->l1(right)->l2(right)->letc(right)->l7(right)->l8(right)->outThe unit
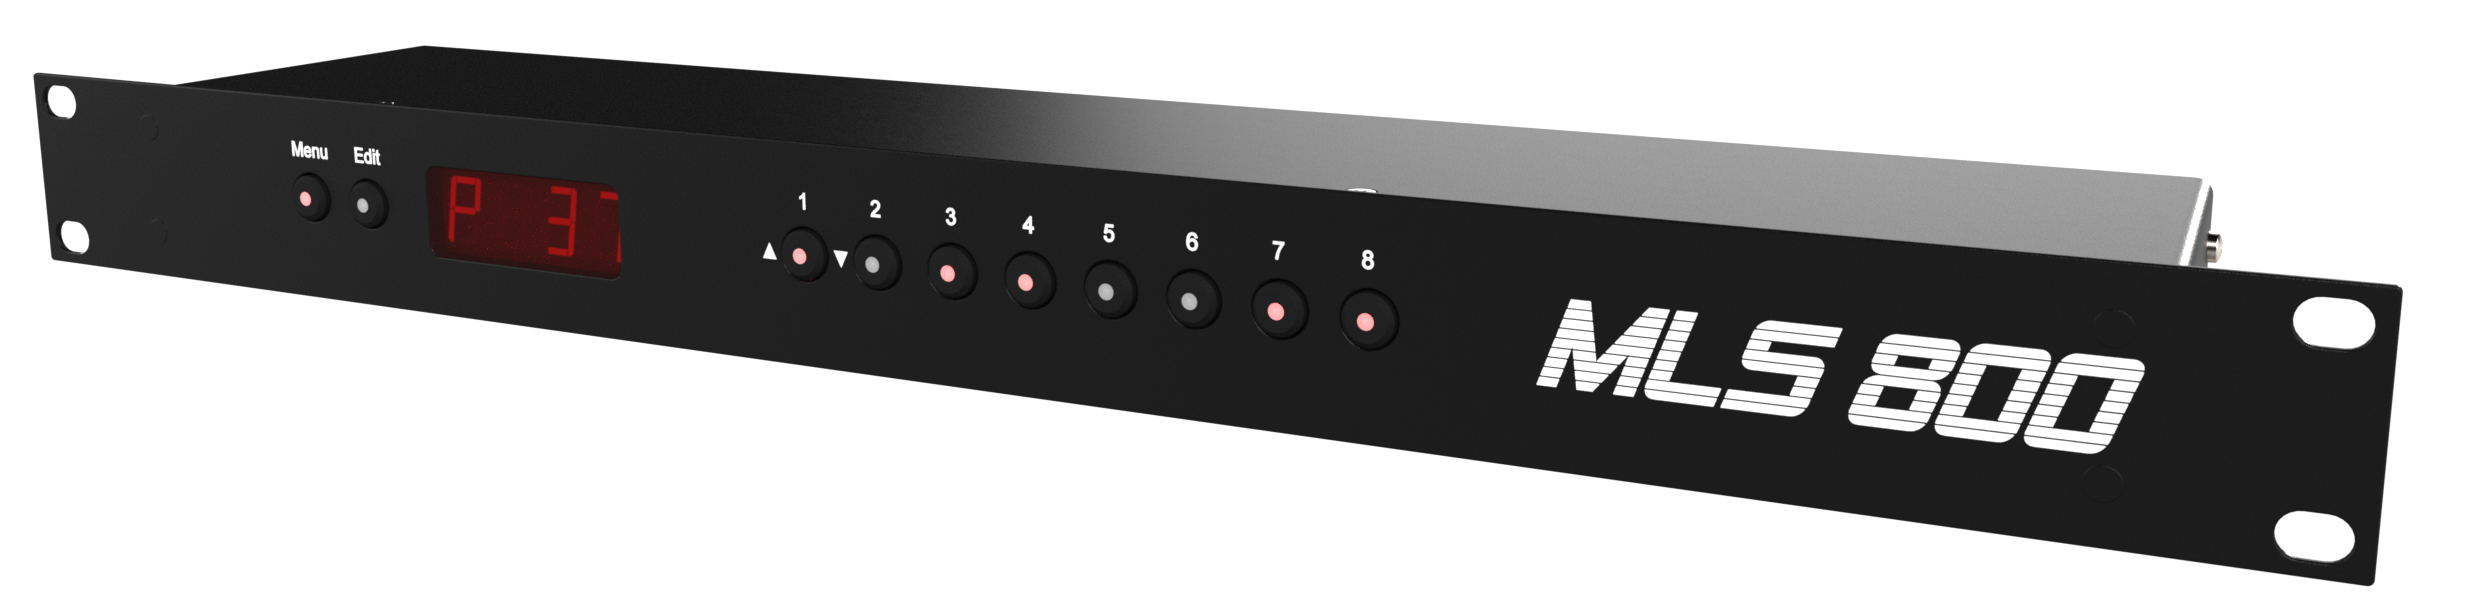
Front panel
- Menu / Power indicator
- Edit / Mode indicator
- Main display
- Editing indicator
- Loop 1 key / Up
- Loop 2 key / Down
- Loop 3 to 8 keys
Back panel
- Power supply input: 2mm ID, 5.5mm OD, positively centered. 9 to 12 VDC @ 1A minimum. Basically, any supply fitting an Arduino Uno will do.
- Reset switch
- USB port. Provides a Serial port and 1x MIDI In, 1x MIDI out ports.
- MIDI Input
- MIDI Thru
- Main audio input
- Loops
1to8send signal - Loops
1to8return signal - Main audio output
Danger
Always use the recommended power supply with the MLS800. Do not exceed the maximum recommended voltage of 12VDC. The USB port does not provide power to the unit.
First use
On power on, the MLS800 applies the last active preset and displays the firmware version for a brief moment. The unit then enters into the Playing mode.
Modes
The MLS800 acts around 3 modes :
playing=>operation: Playing
learning=>operation: Learning
editing=>operation: Editing

playing(right)->learning(right)->editingPlaying: Normal use. Display the active preset.Learning: Waiting for aProgram ChangeMIDI command. The main display and Edit are blinking.Editing: Editing a preset. The main display editing indicator and Edit are on.
You pass from one mode to another by pressing Edit.
Playing
The MLS800 displays the active preset and listens for an incoming MIDI Program Change message. If received, the corresponding preset number will be applied. For instance, the Program Change 54 will load and activate the preset 54.
Note
While in Playing mode, you can manually change the active preset using Up or Down.
Learning
The MLS800 main display and Edit are blinking, while waiting for an incoming Program Change message. Upon receiving one, the current preset state will remain unchanged, and the unit will switch to Editing mode for the requested preset number.
Copying a preset
You can use the fact that the current state will remain unchanged to copy a preset to a new location.
- In
Playingmode, select the preset you want to copy - Switch to
Learningmode by pressing Edit - Send the
Program Changemessage for where you want the preset to be copied - You’re now in
Editingmode. Edit the preset to your needs and press Edit again to save it.
Editing the current preset
Simply press Edit a second time while in Learning mode to edit the current preset.
Editing
The editing indicator and Edit are on. Use keys 1 to 8 to change to the corresponding loop state. Validate your changes by pressing Edit, or cancel them by pressing Menu.
Configuration
You can enter the configuration menu by pressing Menu while in Playing mode.
| Button | Navigation | Edition |
|---|---|---|
Menu |
Exit (sub-)menu | Cancel edit |
Edit |
Enter (sub-)menu / Edit value | Save value |
🔼 (Up) |
Navigate up | Increase value |
🔽 (Down) |
Navigate down | Decrease value |
Editing a value works like in Editing mode. The editing indicator is on, Edit will save the value while Menu will cancel the changes.
| Menu | Description |
|---|---|
menu |
Main menu. Press Menu to return to Playing mode. |
midi |
Configures MIDI. |
→ r |
Configures MIDI Rx channel from 0 to 16. 0 listen to all channels (Omni mode). |
dim |
Configures the main display intensity, from 0 to 15. |
clr |
Factory reset. |
→ yes |
Proceeds with factory reset. After a few seconds, Clear done (clrd) is displayed. |
→ no |
Cancels the factory reset. |
Warning
Factory reset will erase the MLS800 configuration and all presets data!
Firmware update
Being open source, there are several ways you can get this done. You will however certainly need an AVR development environment like the Arduino framework.
avrdude refers to the avrdude executable packed with such environment, usually with avrdude.conf near it.
Flashing the firmware
- Download the latest release

- Connect the MLS800 to your computer using a USB-B cable.
- Run
avrdude -C avrdude.conf -v -pm32u4 -carduino -b57600 -PCOM1 -Uflash:w:mls800.hex:i(replacingCOM1by your actual port)
I’m a developer !
- Clone blemasle/mls800-firmware
- Compiling with the IDE of your choice using the
Arduino Microboard - Upload with your IDE or the command line above